
Class Outline
Observing the Starter
Breaking Bread & Discussion
Breadbaking Tools
Making Your Starter
How to Feed Your Starter
Sourdough Recipes
Discard Ideas
Kneading Demonstration and Lessons – Take Home Pizza Dough!
Observing Mature Starter | When is Your Starter Ready | Trouble Shooting
Breadbaking Tools
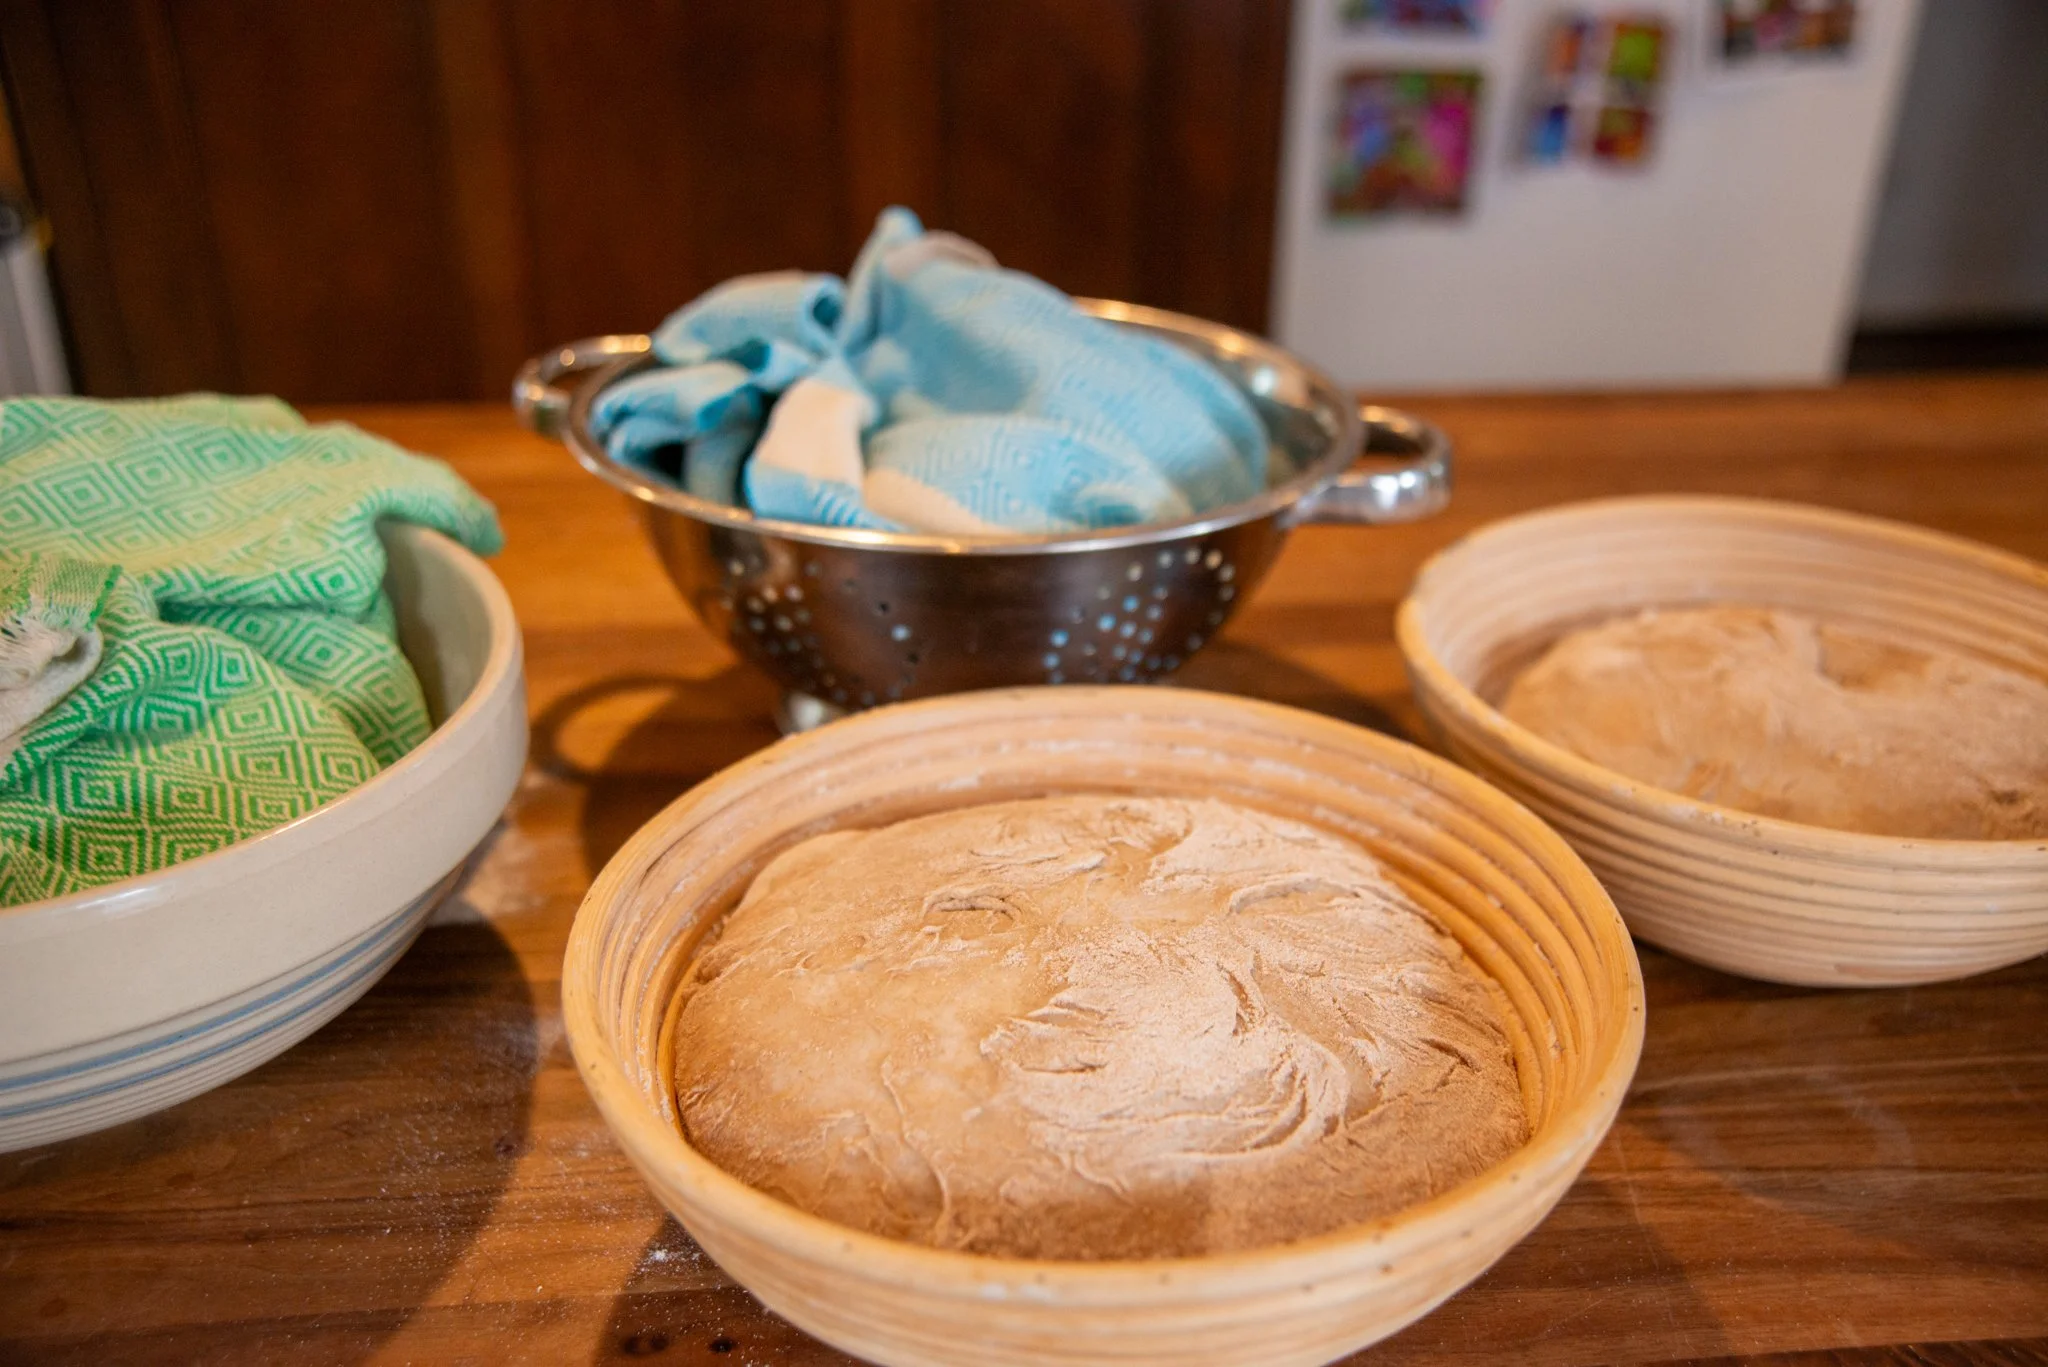
Bread Proofing Baskets (also called brotforms and bannetons)
Made from cane – sometimes lined with washable linen fabric – draws out moisture, shapes loaves, gives a beautiful spiral pattern
Alternative: Line a bowl with a very well-floured kitchen towel
Baker's couche
means bed – for shaping and proofing baguettes – essential to the shape, crust and texture of a baguette
Bread Lame
French-speakers - how is this pronounced?
Handheld razorblade for scoring bread to allow for beautiful expansion and designs
Alternative: serrated bread knife – way more difficult
There are hours of YouTube videos of baker’s scoring bread – it takes practice to get the angle right and find a design you love
Cast Iron Dutch Oven
Commercial ovens often have steam injectors which contribute to beautiful crusts – the best way to achieve excellent texture in the home kitchen is to bake in a cast iron dutch oven
Alternative: pour boiling water into a pan in your oven at the beginning of the baking process
Food scale
Essential for precision measurement and to ensure consistency
Alternative – measure flour by lightly spooning into a measuring cup and leveling off – try to always measure your flour the same way to avoid wild inconsistencies between attempts
Clean kitchen towels
What can’t a clean kitchen towel do? I use a pair of beloved towels from Turkey – any lightweight non-terrycloth towel should do
Bench Knife | Dough Scraper
Countless uses – the best tool for dividing dough – very effective for cleaning up flour
Serrated bread knife
Don’t cut into a sourdough without a proper bread knife – cutting through sourdough is a difficult kitchen task – and nearly impossible without the correct tool
TO BEGIN YOUR STARTER
100 g whole wheat flour or rye flour
100 g warm water
Mix in a glass jar and let sit, loosely covered, at room temperature 24 hours.
You might not see any change or you might see some bubbling.
Either way, after 24 hours feed your starter.
TO FEED YOUR STARTER
100 g unbleached all-purpose flour
100 g warm water
100 g sourdough starter
Mix in a glass jar and let sit, loosely covered, at room temperature.


Feed every 12 hours.
Baby starters can go through stages that smell bad - continue with the process.
By around Day 5, the starter should be bubbling and increasing in volume between feedings.
Starter is ready to bake with when it smells tangy, but not unpleasant, and is doubling in volume between feedings.
Starter can be stored indefinitely at room temperature with 12 hour feeding schedule.
TO STORE IN THE FRIDGE
Once starter is vigorous and ready to bake bread, it can be stored for up to 7 days in the fridge.
TO BAKE BREAD
Adapted from Chad Robertson. “Tartine’s Country Bread.” The New York Times, 2018, Web. 15 April 2018. https://cooking.nytimes.com/recipes/1016277-tartines-country-bread
INGREDIENTS
FOR THE LEAVEN (big batch of starter for the bread)
100 grams bread flour
100 grams whole-wheat flour
100 grams unfed sourdough starter
200 grams warm water
FOR THE BREAD
200 grams leaven
700 grams warm water
900 grams bread flour
100 grams whole-wheat flour
20 grams fine sea salt
100 grams rice flour
100 grams whole-wheat flour
INSTRUCTIONS
Make the leaven:
Combine 100 grams bread flour, 100 grams whole-wheat flour, 100 grams unfed sourdough starter, and 200 grams warm water in a large ceramic or glass bowl. Cover with a warm damp towel and let sit 12 hours or until aerated and puffy in appearance.


Make the dough: In a large glass or ceramic bowl, combine 200 grams of leaven with 700 grams of warm water and stir to disperse.
Add 900 grams of bread flour and 100 grams of whole-wheat flour to bowl and use your hands to mix until no traces of dry flour remain. The dough will be sticky and ragged. Cover bowl with a warm, damp towel and let dough rest for around 30 minutes at room temperature. (It doesn’t look like bread dough at this stage.)

Add 20 grams fine sea salt and 50 grams warm water. Use hands to integrate salt and water into dough thoroughly. The dough will begin to pull apart, but continue mixing; it will come back together. (Starts looking/feeling more like bread dough.)

Cover dough with a towel and transfer to a warm environment, 75 to 80 degrees ideally. (If your house is cold, consider putting a pan of boiling water in a turned-off oven to create a little proofing chest. Keep temp under 110.) Let dough rise for 30 minutes.
Begin 6 sets of stretch and folds - every 30 minutes for 3 hours. Stretch and fold by picking up the dough at one quadrant and allowing gravity to stretch the dough down. Fold the dough over itself. Repeat this action 3 more times, rotating the bowl or the dough a quarter turn each fold. (During this process, it starts to look and feel like bread dough.)

The dough should be billowy and increase in volume 20-30 percent. If not, continue to let rise until it reaches that stage.
Dust a large work surface with whole wheat flour. Move dough onto board. Using a dough scraper, divide the dough into 2 equal pieces. Work dough into a taught round - the flour remains on the outside of the bread. This becomes the crust. Cover with a towel and let rest 30 minutes.


Combine 100 grams whole wheat flour and 100 grams rice flour. Rice flour creates the contrasting white color on the crust of the sourdough. Generously dust two bread-proofing baskets or two kitchen towels laid inside large mixing bowls or colanders.
Transfer rounds, pretty side down, to prepared baskets. Cover with a towel and let sit for 3 to 4 hours.
For a tangier sourdough or for timing reasons, you can also put the dough in the fridge at this point. You can ferment it in the fridge up to about 4 days. The sourdough will intensify in flavor using this process. However, the bread will not rise as well. I always keep mine in the fridge a few days.
About 30 minutes before baking, place a Dutch oven or lidded cast-iron pot in the oven and heat it to 500 degrees. Very carefully remove heated pot from oven and gently turn 1 loaf into pan seam-side down. Use a lame (a baker’s blade) or razor blade to score the top of the bread a few times to allow for expansion, cover and transfer to oven. Reduce temperature to 450 degrees and cook for 20 minutes. Carefully remove lid (steam may release) and cook for 20 more minutes or until crust is a rich, golden brown color.
Transfer bread to a wire rack to rest for at least 15 minutes before slicing (this is a critical part of the process - don’t rush).

Increase oven temperature to 500 degrees, clean out pot and repeat this process with the second loaf.
Take Home Pizza Dough!
https://www.foodnetwork.com/recipes/tyler-florence/pizza-dough-recipe-1914764
Adapted from Tyler Florence. “Pizza Dough” Food Network, 2018, Web. 15 April 2018.
INGREDIENTS
1 package active dry yeast
1 teaspoon sugar
1 cup warm water
1 tablespoon kosher salt
2 tablespoons plus a little olive oil
3 cups all purpose flour
INSTRUCTIONS
In the bowl of a standing electric mixer fitted with a dough hook, combine the yeast, sugar, and warm water; stir gently to dissolve. Let the mixture stand until the yeast comes alive and starts to foam, about 5 to 10 minutes.
Turn the mixer on low and add the salt and 2 tablespoons of olive oil. Add the flour, a little at a time, mixing at the lowest speed until all the flour has been incorporated. When the dough starts to come together, increase the speed to medium; stop the machine periodically to scrape the dough off the hook. Get a feel for the dough by squeezing a small amount together: if it's crumbly, add more water; if it's sticky, add more flour - 1 tablespoon at a time. Mix until the dough gathers into a ball, this should take about 5 minutes.
(Alternatively - mix in a large bowl and knead by hand for 5-10 minutes until smooth and elastic.)
Turn the dough out onto a lightly floured surface and form the dough into a round and place in a lightly oiled bowl, turn it over to coat. Cover with plastic wrap or a damp towel and let it rise in a warm spot (i.e. over a gas pilot light) until doubled in size, about 1 hour. This is a good time to stick a pizza stone in the oven and preheat them to 500 degrees F.
Once the dough is domed and spongy, turn it out onto a lightly floured counter. Roll and stretch the dough into a cylinder and divide into 3 equal pieces. Cover and let rest for 10 minutes so it will be easier to roll out.
Roll or pat out a piece of dough into a 12 inch circle, about 1/8-inch thick. Dust a pizza paddle with flour and slide it under the pizza dough. Brush the crust with a thin layer of olive oil, and top with your favorite flavors. Slide the pizza onto the hot stone in the oven and bake for 12 to 15 minutes, until the crust is golden and crisp. Repeat with the remaining dough.
Reading and Resources
Wood, Ed and Wood, Jean. Classic Sourdoughs Revised A Home Baker’s Handbook. Berkeley: Ten Speed Press, 2011. Print.
Pollan, Michael. Cooked: A Natural History of Transformation. The Penguin Press, 2013.
King Arthur Flour | Baker’s Hotline (855) 371 2253 |